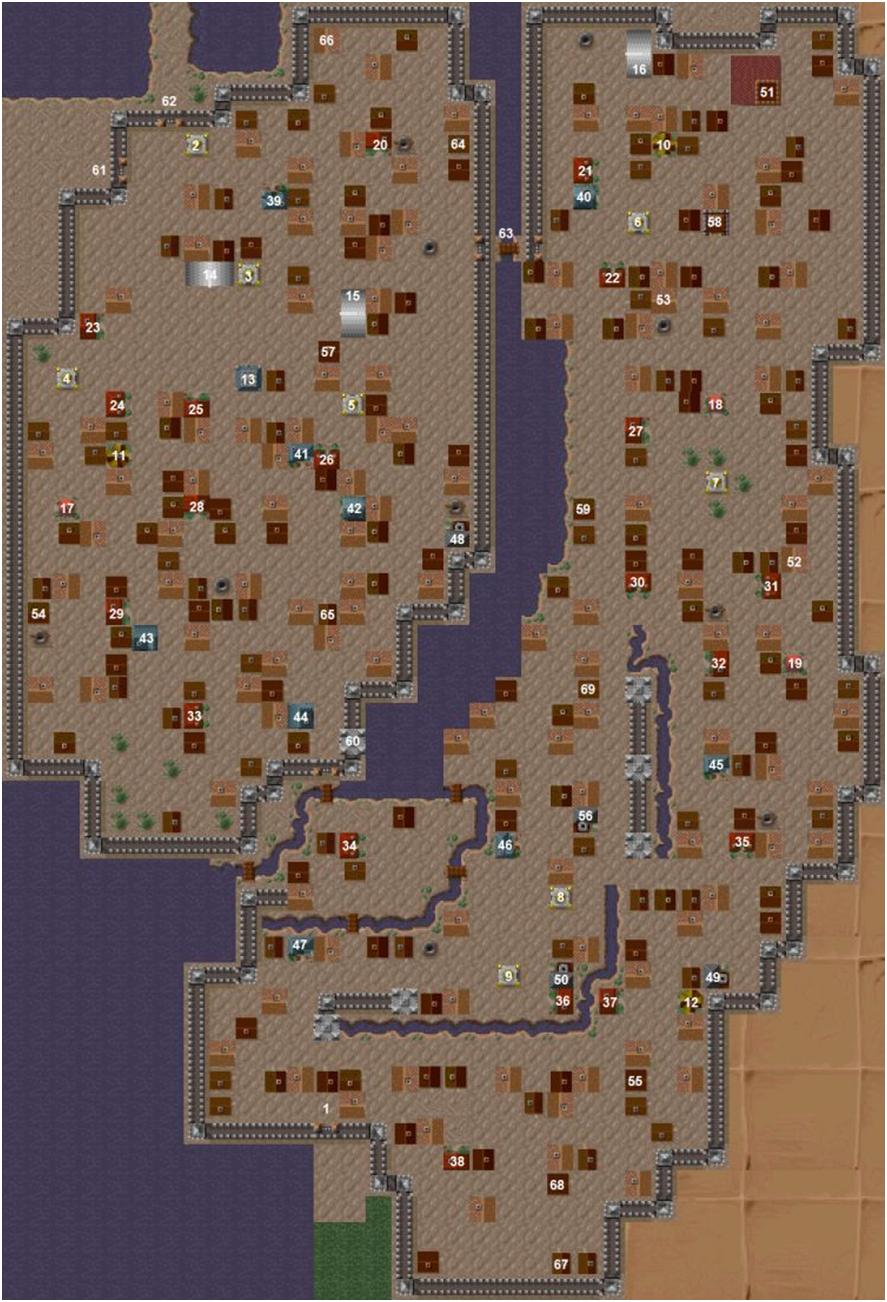
Temple of Phex in Tiefhusen
Temple of Phex in Tiefhusen (Automap made by Kunar)
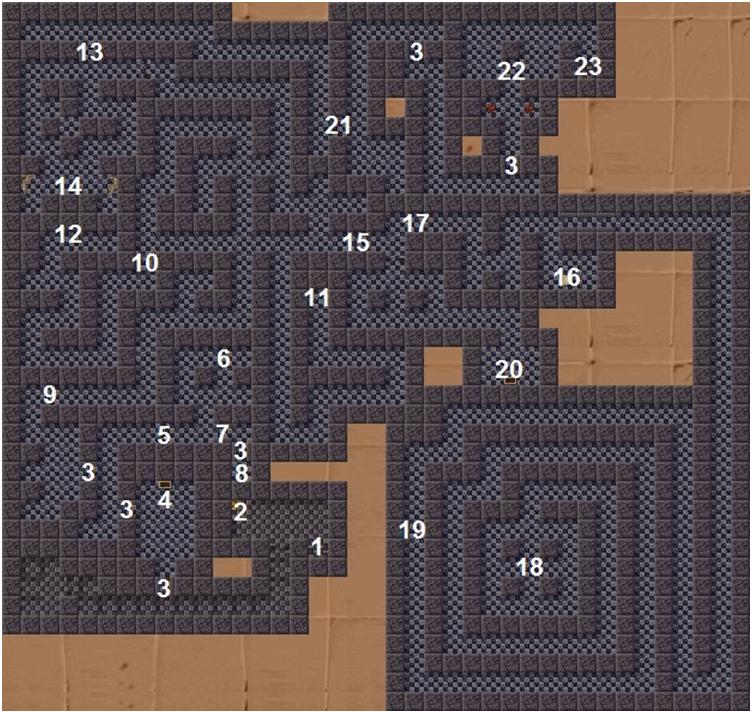

Description
01) You cannot pass through this door. Hensger has locked you up!
02) You find 10 ration packages here
03) A high perception skill will allow you to discover secret walls. They are a bit brighter than ordinary wall sections
04) When you approach the chest, a fight against some priests, who are joined by a high priest after several rounds, will develop. The chest itself contains a golden throwing axe
05) A portcullis blocks the way back
06) If you pick up the recipe for money crapper, you will have to face 4 skeleton warriors
07) This block of stone is lifted up if you picked up the recipe at 6
08) You find a recipe for magic potion here. After picking it up the portcullis at 5 opens
09) You may avoid the pit if your leader passes a test on perception. Otherwise you will get hurt slightly
10) This secret door unlocks by solving the riddle at 11
11) The correct answer to the question is: AT NIGHT. A false answer brings 4 golems to the scene
12) A pairs game. Uncover three foxes to unlock the secret door at 13
13) This secret door can only be opened by solving the pairs game at 12
14) The plaque warns of Boron's curse. If you examine it, 4 skeleton warriors get ready for battle. The loot is a blue key
15) This door opens if you have the blue key (see 14) with you
16) Donate at least 51 ducats at the offertory bowl and the secret door at 21 will be unlocked. If the bowl is getting plundered you will be teleported inside the snail labyrinth (see 18)
17) The crossbow trap is active if you did not donate at the offertory bowl (see 16) or plundered it
18) To leave the snail labyrinth you have to deal with four fights against three skeleton warriors lurking between the pillars. Afterwards a passage opens in the north wall
19) The teleporter relocates you inside the snail labyrinth. You may overcome it by walking backwards
20) This chest holds a Phex' shield and a Phex' helmet. If you pick them up, a Poltergeist is blocking the way back. Cast "Banish spirits" to drive him away
21) This piece of wall disappears if you donate 51 ducats (or more) at the offertory bowl (see 16)
22) Here you meet Hensger again, who is accompanied by a high priest and the young adept, who sent you on the quest to recover Star Trail at the time in Kvirasim. Bow to the statue and do not attack them, otherwise you will be executed in case you try to spend the night at an inn in Tiefhusen. Furthermore you are rewarded with a lot of EPs if you keep calm!
23) After the conversation you may leave the temple by going upstairs at this point
원본 위치 <http://nlt-hilfe.crystals-dsa-foren.de/page.php?113.1>
Tjolmar City Map (Automap made by Kunar)
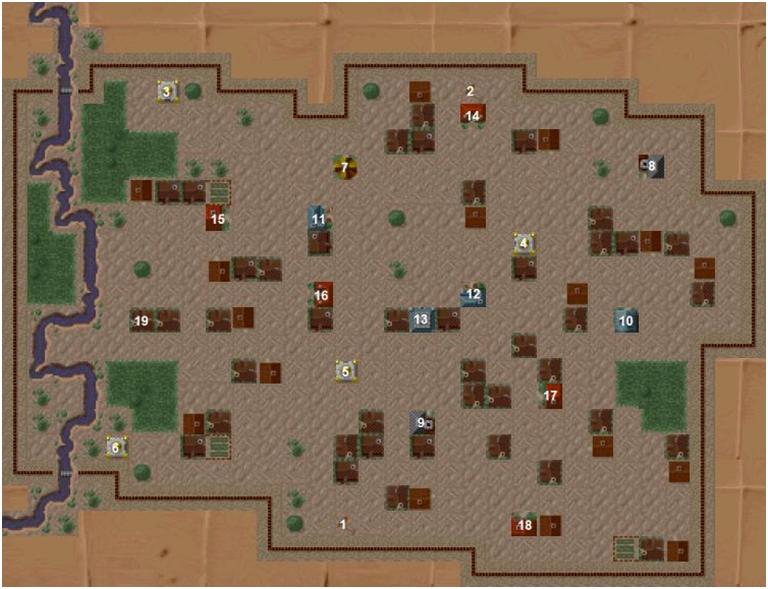
Description
01) Route point to the southeast, leading to Norhus
02) Route point to the north, leading to the marshes of Brinnask (the lowlands to the north of Tjolmar)
03) Temple of Ifirn
04) Temple of Rahja
05) Temple of Ingerimm
06) Temple of Firun
07) Healer "Irion". Heals petrified heroes and is the third best healer in the game
08) Smith "Dugobalosch"
09) Smith "Halrima, daughter of Jorma"
10) Herbalist "Ugdalf Abelmin". Has a nice stock of wares. If you plan to transfer your party to "Shadows over Riva", you may invest your money (which would be lost otherwise) into herbs, before entering the Temple of the Nameless
11) Merchant "Halina Druffin"
12) Merchant "Roglom, son of Radresch"
13) Warehouse "Dreaming mummy"
14) "Carriage yard" inn
15) "Bridge guard" tavern
16) "The cosy" inn
17) "Alebeard" tavern
18) "Red Lotus" tavern
19) House of Ingramosch, the dwarven prince. The door can only be opened with the Salamander Stone. Be sure to have the original, not the copy found at Vindaria Leechbronn's house in Lowangen. Do not let the dwarf at the entrance get rid of you, force your way in instead
원본 위치 <http://nlt-hilfe.crystals-dsa-foren.de/page.php?124.1>
Tiefhusen City Map (Automap made by Kunar)
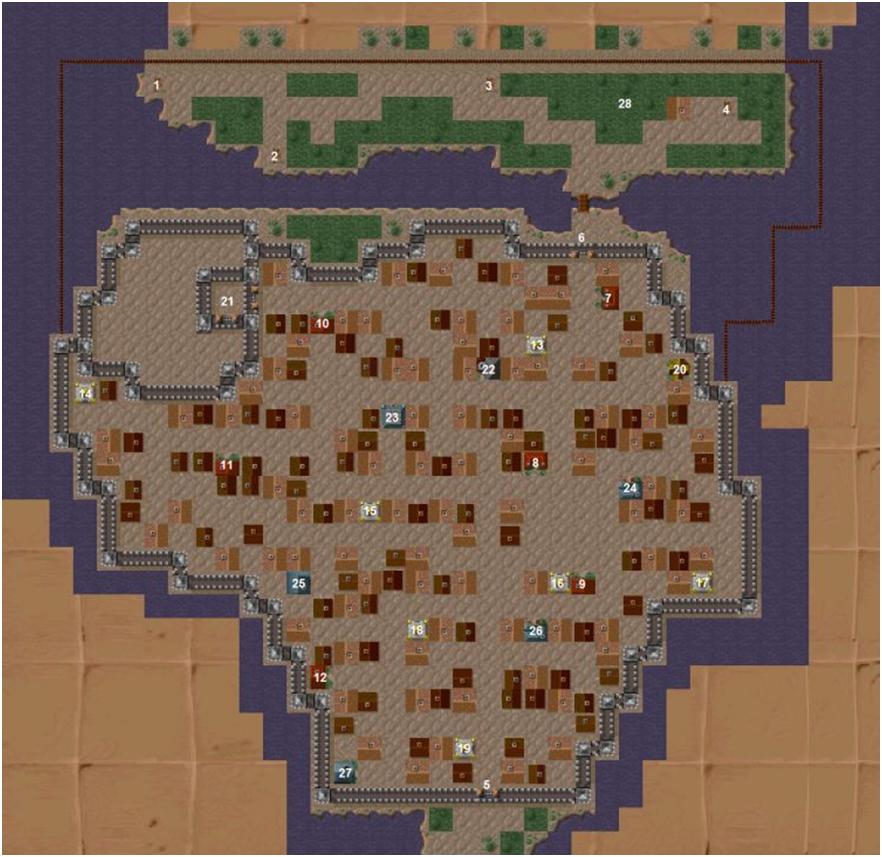
Description
01) Route point to the west, leading to the hermit's lake
02) The pier. You may travel to Tiefhusen by ship, but leaving this town is possible by land only
03) Route point to the north, leading to Hilvalla - Norhus – Tjolmar
04) Route point to the east, leading to the Rorwhed or Gashok
05) You may travel to Svellmia – Netherswamps via the South Gate
06) You enter the town through the North Gate
07) "Northern Light" inn
08) "Firun's hail" inn
09) "The dagger and the sword" tavern
10) "Pile o' gold" tavern. You will meet the drunkard Jandor sitting at a table. Ask him for "Star Trail" until he agrees to arrange a meeting with Hensger
11) "At the duck's bead" tavern
12) "Wide World" tavern
13) Temple of Hesinde
14) Temple of Firun
15) Temple of Rondra
16) Temple of Rahja
17) Temple of Boron
18) Temple of Phex. It is locked. You may enter it with the assistance of Hensger only (quest)
19) Temple of Travia
20) Healer "Jasper Elkensiepen". The most incompetent healer besides Tralloper in Gashok. The next recommendable healer resides in Tjolmar
21) Castle Tiefhusen. Closed for visitors and heroes
22) Smith "Tjall Hövensson"
23) Warehouse "At the mistuned lute"
24) Merchant "Meldavia Gosht"
25) Armorer "Runhild Hermertal". Ask her for "Star Trail". She refers you to Jandor in the "Pile o' gold"
26) Merchant "Rogard Gernebsen"
27) Herbalist "Ariona Silverdew". Has fear poison in stock, though it is not too cheap due to Tiefhusen being the second most expensive town in the Svelltdale. Therefore collecting and selling herbs is a nice business in Tiefhusen
28) Hensger is leaning to a tree here. He will only lead you to the temple of Phex, if you talked to Jandor in the "Pile o' gold" before
Tiefhusen is no shopping paradise, in fact it is a trading paradise instead. As already mentioned, Tiefhusen is the second most expensive town, only exceeded by Lowangen. Selling loot and herbs should ease your money troubles swiftly
원본 위치 <http://nlt-hilfe.crystals-dsa-foren.de/page.php?123.1>
The Netherswamps (Automap made by Kunar)
Description
01) Exit to the north, leading to the Rorwhed (Tiefhusen – Gashok bypass)
02) Exit to the east, leading to the ferryman (Gashok – Neulowangen bypass)
03) This entrance collapses after being used once
04) Exit to the south, leading to the Thash mountains (Lowangen – Arsingen bypass)
05) Exit to the south, leading to Arsingen
06) Exit to the west, leading to the Arsingen – Svellmia riverside road
07) Exit to the west, leading to Svellmia (river port)
08) Fights against orcs, goblins, zombies or swamp rantzies await you in these locations
09) You may stumble upon a poisonous kvill adder here. Beware!
10) A gulmond bush
11) This hedge can only be breached from the north to the south
12) House of the swamp witch. This encounter is enabled if you talked to the lizard chieftain, fulfilled his mission and received Master Eolan's job in Lowangen
13) A large herb garden
14) A cart is stuck in the mud. Besides some items you find 15 ducats
15) Location of the lizard dwelling Ansvell. You may only understand the lizard chieftain if your leader passes a test on "Tongues". In case of need, walk across this field repeatedly, until the text is shown in English. Offer your help and take care of his mission (see 18)
16) A belmart leaf
17) 20 heather plants are lined up along the water's bank. You have to read the swamp rantzy-document (see 21) before you are able to discover them. The eighteenth plant is needed to perform the transformation of the swamp rantzy also known as Agdan Dragenfeld (see 24)
18) The Engulfer lies in wait here. Kill him in order to solve the lizard chieftain's quest and return to location 15
19) A bog body drifts in brackish water. Maybe something special will happen, if the heroes fail a test on necrophobia, though this is unclear by now
20) Some loneberries may be found here
21) The sunk in chest opens as recently as you accept Master Eolan's mission in Lowangen. It contains a net, a healing potion and a swamp rantzy-document. Pick up everything!
22) Zombies dwell in this house. Click on the door to provoke a fight
23) Sorcerer's island. The swamp witch sends you here to sneak in the tower and assassinate its inhabitant. When you are confronted with the fire elemental, choose humble answers like "Help", "Mercy" or "Love" and you shall survive. Take the Noctrux-document and the crystal ball with you
24) A swamp rantzy wearing a dragon ring stands around here. Catch it with the net, but do not kill it! If you have the heather with you and read the Noctrux-document, use the heather to retransform the swamp rantzy into Agdan Dragenfeld. Cure his Numbskull and return to Lowangen together via the secret tunnel
To perform the transformation one hero (whosoever) must have the trapped swamp rantzy, the Noctrux-document (read it first) and the heather in his/her baggage!
Note: To open the chest at 21 it is necessary to turn off the "walk stepwise"-option in the game menu which you can call by pressing the F3 key on your keyboard! Then step towards the chest and it will open. After opening the chest you can return into stepwise mode by pressing the F3 key again and turn the option to ON. This may be a bug in the disk version of Star Trail only which was not fixed.
원본 위치 <http://nlt-hilfe.crystals-dsa-foren.de/page.php?126.1>
Lowangen City Map (Automap made by Kunar)
Description
01) If you entered Lowangen via the orc camp, you find yourselves at this point. You cannot go back and will be attacked by powerful orcs each time you try to do this
02) Temple of Boron
03) Temple of Hesinde. If you ask the priest for Lowangen, a map of the town is shown
04) Temple of Travia
05) Temple of Phex
06) Temple of Tsa
07) Temple of Rahja
08) Temple of Peraine
09) Temple of Ingerimm
10) Healer "Jhaell Startrail". Is able to cure petrified heroes and the second best healer in the game (according to Star Trail solution book)
11) Healer "Parinor Vormtann"
12) Healer "Kysira"
13) Warehouse "At the happy mouse"
14) Academy of deformations. You may have your magical items analysed here
15) Magistracy. You may donate weapons and food here. Donating 20 swords will leave you as honorary citizens of Lowangen and 5.000 EPs richer (per head)
16) Hall of Power. This is where to deliver Dragan's packet (Dragan's third mission)
17) "Wonderland" brothel
18) "Thousand desires" brothel
19) "The rod and the mare" brothel
20) "Klonballa's" tavern
21) "The White House" inn
22) "Colourful flight" inn
23) "Little fox den" tavern
24) "The inn" inn
25) "Hammer and Anvil" tavern
26) "Bit and Ducat" inn
27) "Salamanderstone" tavern
28) "Dark eye" tavern
29) "Orc death" tavern. You must follow Gavron from here if you want to recover the Salamander Stone
30) "Svelltje palace" inn
31) "Great freedom" inn
32) "Water and wine" tavern
33) "Little prince" inn
34) "Eydal House" inn
35) "Trenchbog" inn
36) "Hammer and Anvil" tavern. Yes, there are two of them!
37) "At the canal" tavern
38) "Last hour" tavern
39) Merchant "Ugo Plotz". The most interesting one regarding his stock
40) Herbalist "Farmion of the Kvill". Worth a look
41) Merchant "Desdira Falconbrook"
42) Herbalist "Dimiona Adingor"
43) Armorer "Eilif Yasmasson"
44) Armorer "Duridanya Zornbrecht"
45) Merchant "Vistella Ebenborn"
46) Merchant "Jandor Ungert"
47) Merchant "Thorescha"
48) Smith "Thorin Bromkop"
49) Smith "Roglima the Great"
50) Smithery of Ingerimm
51) Castle of the Order of Grey Staves. You will leave the town from here via a secret tunnel. Later on this requires the Lowangen key
52) Black Jandora. She demands 500 ducats for further information in respect of leaving the town. After you bring in Dragan's name this will be cheaper
53) Ailian Sevensprings. Possesses the real Salamander Stone
54) Dragan Escht. You depend on his help and relations. Fulfil his missions
55) Vindaria Leechbronn. Possesses a faked Salamander Stone. More goodies are to be found in her house after a successful fight
56) Smith "Berman Helmisch"
57) Market hall. The fight against 20 beggars earns quite a lot of EPs if this is your first encounter with this kind of enemy
58) Exhibition of Art in Craftsmanship. You need to break in here and steal a brooch (Dragan's second mission)
59) The Vinsalter. Get him to Dragan (Dragan's first mission)
60) Guard house and jail. You will be brought here if you get arrested
61) Castle Lowangen. Fights against guardsmen are not profitable. Quite the opposite, your arms will be confiscated and you will be jailed
62) The North Gate of Lowangen. You cannot leave the town, instead you will be attacked by powerful orcs
63) Rainbow bridge. Donate a few bits otherwise Tsa might be displeased
64) Falkert Duberwin. Dragan's contact in respect of weapons
65) Brin Vaskendantz. Dragan's contact concerning overnight accommodation
66) Master Deringorn. This is his home, although you meet him in the Hall of Power (see 16) usually
67) Raisha Rotenegger. Dragan's contact regarding food
68) Pagon Droler. Function in the game is still unknown
69) Zaskia Angrond. Function in the game is still unknown
It is recommended that you spend the night at one of the town's brothels. This results in an improved regeneration of LP and EP and apart from that your equipment will be safe!
원본 위치 <http://nlt-hilfe.crystals-dsa-foren.de/page.php?125.1>
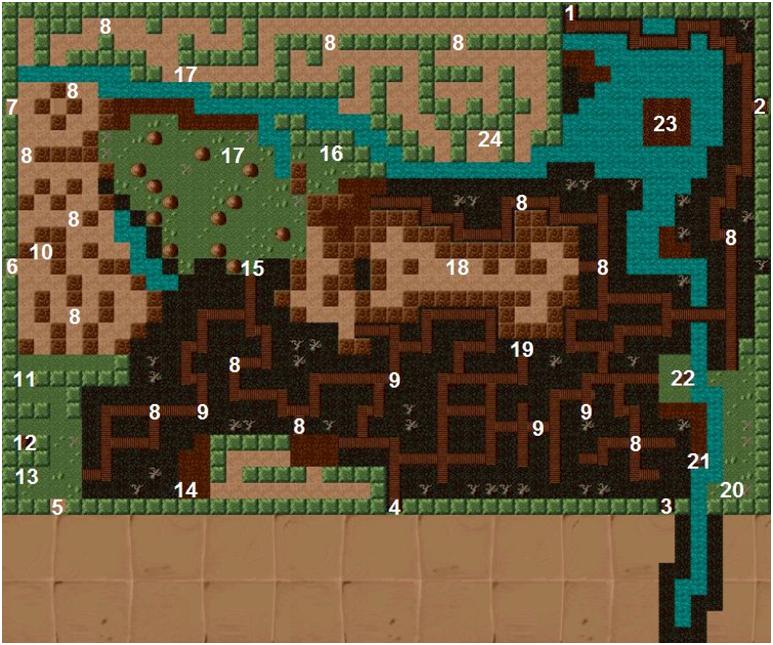
Dwarven Pit - Sixth Level
Dwarven Pit - Sixth Level (Automap made by Kunar)
Description
01) Stairs leading up to level 5
02) Chest: sword, dagger (heavy), cudgel, throwing star, 3x girdle of Might, parchments
03) This piece of wall opens with the double bearded key (see level 1, location 5)
04) This hole contains a pouch with an asthenil knife and some coins (red) in it. You only have one try to recover it! Save your game, if you want to nail down these goodies
05) Chest: pants, robes, shirts, winter coats, quilt armors, five times each
06) Chest: key ring, war axe, 2 heavy crossbows, 40 bolts
07) You may refill your waterskins here
08) Chest: leather vests, leather pants, leather boots, seven times each. You need this clothing in order to cross the plates at 9. Put it back afterwards, otherwise the stairs at 1 will be blocked by a massive wall
09) You may walk safely across these plates if you put on the leather clothing found at 8. On your way back with the Salamander Stone, wearing the asthenil ring is helpful. It is sufficient to send one hero across the plates. He/She must be equipped with a burning torch and the stone medallion found earlier. If you violated the dwarven graves on level 3, attacked the stone golem at 11 or pillaged Ingerimm's treasure (13), you will be burnt while wandering across the plates. Ingerimm does not forgive!
10) Use a burning torch with the wall and a passage to the smithy will open
11) At this point you meet a golem, either by just walking over or smiting the anvil. Give him the stone medallion and do not attack! Otherwise you will not be able to leave this place
12) Chest: contains the Salamander Stone. Accept the bartering
13) Here you will find Ingerimm's treasure. It consists of green coins, green jewels, jewelry (green), 5 jewels, 10 pieces of gold jewelry and 5.000 ducats. If you decide to pillage the chest, you will not escape with your life (see 9). Oh well...
14) The shaft leads to level 4. This area can only be reached via level 4 or the mouth of a cave (see 15). Transversalis does not work!
15) The mouth of a cave leads to the outside or the inside as well, if you approached the mountains from the West. However, it collapses after you have used it once and is no longer available
If you mess around with the drain grate (see 7), you may get Numbskull (e-mailed by cassim)
원본 위치 <http://nlt-hilfe.crystals-dsa-foren.de/page.php?132.1>
Dwarven Pit - Fifth Level
Dwarven Pit - Fifth Level (Automap made by Kunar)

Description
01) Stairs leading to level 4
02) Your heroes will take a bath, if they got dirty while climbing the shaft leading to the double bearded key (see level 1)
03) Swim around within this area to find a magical waterskin. Make sure each hero has at least one free inventory slot and will not get overloaded in case of picking up the waterskin. Otherwise it will be lost!
04) If you let the water flow off by giving the wheel a spin (see level 4, location 8), you may reach this slab. The only way to open it is using a crowbar. This will free a passage to level 6
원본 위치 <http://nlt-hilfe.crystals-dsa-foren.de/page.php?131.1>
Dwarven Pit - Fourth Level
Dwarven Pit - Fourth Level (Automap made by Kunar)

Description
01) Stairs leading up to level 3
02) The figures on the well come to life if you examine them. They turn out to be gargoyles, 4 in number. Defeating them will earn you a nice bunch of EP. The well itself is of no further interest
03) You may rope one of your heroes wearing the asthenil ring down the lava pit. There is nothing here however. Alternatively, you can throw in the fire powder discovered earlier. This will cause a somewhat heavy reaction, but it is not critical
04) The shaft leads to level 3 or 6
05) A fight against 4 undead dwarves and 1 zombie awaits you. Besides other goodies, you receive a stone medallion, which is very important
06) A red fur is covering the wall. If a hero slips and shores up against the wall, his hands begin to smart
07) The wall is covered with a blue fur, which cools your hands
08) Do not care about the wheel until you have found the magical waterskin on level 5. After that, return here and give the wheel a twirl. This will let the water flow off
09) You may find a healing potion in this hole
10) Stairs leading to level 5
원본 위치 <http://nlt-hilfe.crystals-dsa-foren.de/page.php?130.1>
Dwarven Pit - Third Level
Dwarven Pit - Third Level (Automap made by Kunar)

Description
01) Stairs leading up to level 2
02) The rail truck can be greased with the cart-grease. If one your heroes takes a ride with the truck and does not jump off in time, it will crash against the wooden construction at the end of the path, leaving him unconscious and a few EPs richer
03) The rubble can be cleared out using shovels. The first two heroes receive EP for this task
04) The hallway has collapsed at these locations, but it can be cleared nevertheless
05) The shaft leads to level 2 or 4
06) You find jewelry (red), copper key (big) and an asthenil dagger. The key is useless
07) When you examine the skeleton, it will attack at once. It carries some scrolls of parchment, which crumble to dust very soon. A few fragments are recorded in your diary however
08) There is danger of a caving-in here
09) Chest: 10x piton, rope ladder, rope, grappling hook
10) An agile hero may jump over the pit. Give him a rope, so he can fasten it at the other end.
11) This lever closes the pit at 10
12) Chest: whetstone, dagger (heavy), sickle, 2 knives, dagger
13) Chest: kukris dagger, coins (red)
14) Leave the dwarven graves alone. If you violate them, Ingerimm's wrath will be upon you and you will be attacked by an undead dwarf each time you do this. This is fatal in case you do not have the Salamander Stone already! If you do not want the game to end this early, better ignore this room
15) Your heroes can slide down the ore chute, which is a real joy
16) You can take as much pieces of ore as you can carry. It is rather useless however, so you should take only one piece, in case you want to try out the recipe of moneymaker (which is useless too)
17) Stairs leading down to level 4
원본 위치 <http://nlt-hilfe.crystals-dsa-foren.de/page.php?129.1>
Dwarven Pit - Second Level
Dwarven Pit - Second Level (Automap made by Kunar)

Description
01) Stairs leading up to level 1
02) This lever deactivates the crossbow trap at 13
03) This pressure plate triggers the crossbow trap at 14
04) Chest: cart-grease, crank
05) Chest: throwing axe, hatchet, girdle of Might, skull girdle
06) Chest: girdle of Might, 3 shields, 3 iron shields, 3 boots
07) This hole holds a pouch with some coins and jewels in it
08) The shaft leads to level 1 (upwards) and 3 (downwards) of the pit
09) The door cannot be opened. There is nothing behind
10) If you pull the lever, the floor beneath you will open and you find yourself in a small room, where you have to face 5 undead dwarves. If you are victorious, you may leave the room via a ramp
11) Chest: 10x ration package, 10x tableware, 10x cutlery, 10x water skin, drinking horn
12) This crossbow trap is not loaded
13) The crossbow trap is loaded. You may deactivate it by turning the lever at 2
14) The crossbow trap is not active. See 3
15) This piece of wall descends behind you, when you enter the room to the North. Make sure you took the chain (level 1, location 14) and crank (level 2, location 4) with you
16) You are able to fix the mechanism using a chain and a crank. If you succeed to do so, the wall at 20 opens
17) When you try to examine the chest, you are discovered by a gnome. Be polite and donate a present, which is worth 5 ducats at least (a festering toadstool for example). The answer to his riddle is MOOSE. After this you receive the rich silver key, which is necessary to leave the pit. If you laugh at the gnome or attack him, he teleports your party to rather nasty locations of the pit
18) This hole holds a rat trap
19) Stairs leading down to level 3
20) This piece of wall disappears after you have fixed the mechanism at 16
원본 위치 <http://nlt-hilfe.crystals-dsa-foren.de/page.php?128.1>
 Prev
Prev

 Rss Feed