'javascript'에 해당되는 글 10건
- 2009.05.21 Creating interactive alert, confirm, and prompt boxes using JavaScript
- 2009.05.20 javacript 로 만든 달력 샘플
- 2009.05.19 How to get value from TextBox, RadioButtonList, DropDownList, CheckBox through JavaScript
- 2009.04.17 javascript 에서 html 오브젝트 value 가져오기
- 2009.03.03 정규식을 이용한 숫자입력 체크 함수
- 2009.02.20 formatnumber
- 2009.02.20 Javascript 에서 알아야할 기초사항
- 2009.02.20 자바스크립트로 숫자에 "," 표시
- 2009.02.20 자바스크립트, 16진수 헥사(Hex), 2진수, 10진수 변환 함수; JavaScript
- 2009.02.06 Javascript Key Event Test Script
Creating interactive alert, confirm, and prompt boxes using JavaScript
출처 : Creating interactive alert, confirm, and prompt boxes using JavaScript
|
 JavaScript_AlertConfirmPrompt.aspx
| Click here for output: |
<script type="text/javascript">
    var x=window.confirm("Are you sure you are ok?")
    if (x)
    window.alert("Good!")
    else
    window.alert("Too bad")
</script>
There are several concepts that are new here, and I'll go over them. First of all, "var x=" is a variable declaration; it declares a variable ("x" in this case) that will store the result of the confirm box. All variables are created this way. x will get the result, namely, "true" or "false". Then we use a "if else" statement to give the script the ability to choose between two paths, depending on this result. If the result is true (the user clicked "ok"), "good" is alerted. If the result is false (the user clicked "cancel"), "Too bad" is alerted instead. (For all those interested, variable x is called a Boolean variable, since it can only contain either a value of "true" or "false").
The third one is:
window.prompt()
Prompt is used to allow a user to enter something, and do something with that info:
| Click here for output: |
|
<script type="text/javascript">
    var y=window.prompt("please enter your name")
    window.alert(y)
</script>
The concept here is very similar. Store whatever the user typed in the prompt box using y. Then display it.
How to get value from TextBox, RadioButtonList, DropDownList, CheckBox through JavaScript
This picture is the UI screenshots of the the code I am going to present in this article

Getting TextBox Value in JavaScript
.aspx page code
Following code will render a TextBox and a Button control as displayed in the picture above.
<table>
    <tr>
        <th colspan="2" align="left">
            Getting TextBox Value in JavaScript:
        </th>
    </tr>
    <tr>
        <td>
            <asp:TextBox ID="txt1" runat="server"></asp:TextBox>
        </td>
        <td>
            <input type="button" value="Submit" onclick="GetTextBoxValue('<%= txt1.ClientID %>')" />
        </td>
    </tr>
</table>
JavaScript function
Following code is JavaScript function to get value from TextBox control.
// Get TextBox value
function GetTextBoxValue(id)
{
    alert(document.getElementById(id).value);
}
Getting DropDownList/ListBox selected value
Following code will render a DropDown (Html select control) and a button as displayed in the picture above.
.aspx code
<table>
<tr>
    <th colspan="2" align="left">
        Getting DropDown/ListView Value
    </th>
</tr>
<tr>
    <td>
        <asp:DropDownList ID="dropDown" runat="Server">
            <asp:ListItem Text="Item 1" Value="1" Selected="True"></asp:ListItem>
            <asp:ListItem Text="Item 2" Value="2"></asp:ListItem>
            <asp:ListItem Text="Item 3" Value="3"></asp:ListItem>
        </asp:DropDownList>
    </td>
    <td>
        <input type="button" value="Submit" onclick="GetDropDownValue('<%= dropDown.ClientID %>')" />
    </td>
</tr>
</table>Following is the JavaScript function to get the value from DropDown control
// Get DropDown value
function GetDropDownValue(id)
{
    alert(document.getElementById(id).value);
}
Getting RadioButtonList selected value
Following code will render RadioButtons and a button as displayed in the picture above.
.aspx code
<table>
    <tr>
        <th colspan="2" align="left">
            Getting RadioButton Value
        </th>
    </tr>
    <tr>
        <td>
            <asp:RadioButtonList ID="radiobuttonlist1" runat="Server" RepeatLayout="flow" RepeatDirection="horizontal">
                <asp:ListItem Text="Radio 1" Value="1" Selected="True"></asp:ListItem>
                <asp:ListItem Text="Radio 2" Value="2"></asp:ListItem>
                <asp:ListItem Text="Radio 3" Value="3"></asp:ListItem>
            </asp:RadioButtonList>
        </td>
        <td>
            <input type="button" value="Submit" onclick="GetRadioButtonValue('<%= radiobuttonlist1.ClientID %>')" />
        </td>
    </tr>
</table>
JavaScript Code
Following is the JavaScript function to get the selected value from RadioButtons
// Get radio button list value
function GetRadioButtonValue(id)
{
    var radio = document.getElementsByName(id);
    for (var ii = 0; ii < radio.length; ii++)
    {
        if (radio[ii].checked)
            alert(radio[ii].value);
    }
}
Getting CheckBox checked status
Following code will render a checkbox and a button as displayed in the picture above.
.aspx code
<table>
    <tr>
        <th colspan="2" align="left">
            Getting Checkbox Value
        </th>
    </tr>
    <tr>
        <td>
            <asp:CheckBox runat="server" ID="checkBox1" Text="Check Box" />
        </td>
        <td>
            <input type="button" value="Submit" onclick="GetCheckBoxValue('<%= checkBox1.ClientID %>')" />
        </td>
    </tr>
</table>
JavaScript Code
Following is the JavaScript function to get value from a Checkbox.
// Get Checkbox checked status
function GetCheckBoxValue(id)
{
    alert(document.getElementById(id).checked);
}
Show/Hide Text using
Following code will render three buttons and a table element having some text as displayed in the picture above.
.aspx code
<b>Show/Hide display text</b><br />
<input type="button" value="Toggle Display Following Text" onclick="ToggleFollowingText('table1')" />
<input type="button" value="Show Only" onclick="ShowOrHide('show', 'table1')" />
<input type="button" value="Hide Only" onclick="ShowOrHide('hide', 'table1')" />
<table id="table1">
    <tr>
        <td style="background-color:Aqua">
            This is my hidden text, You can play with it by clicking above button.
        </td>
    </tr>
</table>
JavaScript Code
Following is the JavaScript function to toggle display the table and show and hide element the table.
// Show/Hide element
function ToggleFollowingText(id)
{
    document.getElementById(id).style.display == '' ? document.getElementById(id).style.display = 'none' : document.getElementById(id).style.display = '';

}

// Either show or hide element
function ShowOrHide(condition, id)
{
    if (condition == 'show')
        document.getElementById(id).style.display = '';
    else if (condition == 'hide')
        document.getElementById(id).style.display = 'none';

}
javascript 에서 html 오브젝트 value 가져오기
1과 2는 동일하게 동작한다.
1. ---------------------------------------------
var strWhNm = "<%=txtWhNm.ClientID%>";
var strWhCd = "<%=hfWhCd.ClientID%>";
var strProdClassNm = "<%=txtProdClassNm.ClientID %>";
var strProdClassCd = "<%=hfProdClassCd.ClientID%>";
var strProdNm = "<%=txtProdNm.ClientID %>";
var strProdCd = "<%=hfProdCd.ClientID%>";
var strWhNmValue = document.all[strWhNm].value;
var strWhCdValue = document.all[strWhCd].value;
var strProdClassNmValue = document.all[strProdClassNm].value;
var strProdClassCdValue = document.all[strProdClassCd].value;
var strProdNmValue = document.all[strProdNm].value;
var strProdCdValue = document.all[strProdCd].value;
2. ---------------------------------------------
var strWhNmValue = window.document.forms[0].<%=txtWhNm.ClientID%>.value;
var strWhCdValue = window.document.forms[0].<%=hfWhCd.ClientID%>.value;
var strProdClassNmValue = window.document.forms[0].<%=txtProdClassNm.ClientID%>.value;
var strProdClassCdValue = window.document.forms[0].<%=hfProdClassCd.ClientID%>.value;
var strProdNmValue = window.document.forms[0].<%=txtProdNm.ClientID%>.value;
var strProdCdValue = window.document.forms[0].<%=hfProdCd.ClientID%>.value;
* 단점 : 한글인 경우 체크가 안됩니다....ㅠㅠ
// 숫자, 콤마(,), 소숫점(.) 허용한 숫자체크
// 반환값 true / false
function IsNumber(strNumber)
{
var reg = RegExp(/^(\d|-)?(\d|,)*\.?\d*$/);
return reg .test(strNumber);
}
// IsNumber함수를 이용한 필드 입력값 체크
// 사용방법 : <input type="text" onkeyup="CheckNumber(this)">
function CheckNumber(field) {
if( !IsNumber(field.value) )
{
alert!("숫자형식만 입력해주십시오.");
field.value="0";
field.focus();
field.select();
}
}
출처 : 몽키님 블로그
(http://blog.daum.net/monkeychoi/4967162?srchid=BR1http%3A%2F%2Fblog.daum.net%2Fmonkeychoi%F4967162)
별자리님께서 올려주신 formatnumber에 대한 이야기입니다.^^;두고두고 도움이 될듯 싶어... 또 미쳐 양해도 구하지 않고 걍,, 올립니다. -_-;formatnumber함수에 대해 자알 정리를 해주셨으니 참고들 하시구요^^
http://www.tubemusic.com운영하시는 사이트에도 한번 놀러들 가보시구요^^;=================================================================================FormatNumber함수를 사용하세요!!
일반적으로.. 소수점 및 3자리마다 콤마(,) 사용시에 많이 사용됩니다.. 예) 12345 -> 12,345 이렇게 표현할려면 DATA = 12345 FormatNumber(DATA, 0)이렇게 처리하면..됩니다...
참고로.. 위의 DATA가 NULL(값이 존재하지 않는다)이면.. 오류가 발생하므로꼭 주의 하시길 바랍니다.. ※ FormatNumber 함수란? ※ 숫자로 형식화된 식을 반환합니다. FormatNumber(Expression [,NumDigitsAfterDecimal [,IncludeLeadingDigit [,UseParensForNegativeNumbers [,GroupDigits]]]]) 인수Expression 필수적인 요소. 형식이 지정되는 식입니다. NumDigitsAfterDecimal 선택적인 요소. 표시될 소수점 이하의 자릿수를 나타내는 숫자 값입니다. 기본값인 -1은 컴퓨터의 국가별 설정을 사용함을 나타냅니다. IncludeLeadingDigit 선택적인 요소. 소수점 이하의 유효 숫자 앞에 0을 표시할지 여부를 나타내는 Tristate 상수입니다. 그 값에 대해서는 아래의 설정을 참조하십시오. UseParensForNegativeNumbers 선택적인 요소. 음수 값을 괄호 안에 넣을지 여부를 나타내는 Tristate 상수입니다. 그 값에 대해서는 아래의 설정을 참조하십시오. GroupDigits 선택적인 요소. 제어판에 설정된 그룹 구분 기호를 사용하여 숫자를 구분할지 여부를 나타내는 Tristate 상수입니다. 그 값에 대해서는 아래의 설정을 참조하십시오. 설정IncludeLeadingDigit, UseParensForNegativeNumbers, GroupDigits 인수는 아래 설정을 가집니다.
상수 값 설명 TristateTrue -1 True TristateFalse 0 False TristateUseDefault -2 컴퓨터의 국가별 설정 값을 사용합니다.
참고하나 이상의 선택적인 인수를 생략하면 컴퓨터의 국가별 설정 값을 생략된 인수 값으로 사용합니다. 메모 모든 설정 정보는 국가별 설정의 숫자 탭에 있습니다. 예제) 1234.123 FormatNumber(DATA, 4) -> 1,234.1230 FormatNumber(DATA, 3) -> 1,234.123 FormatNumber(DATA, 2) -> 1,234.12 FormatNumber(DATA, 1) -> 1,234.1 FormatNumber(DATA, 0) -> 1,234
별자리님께서 올려주신 formatnumber에 대한 이야기입니다.^^;두고두고 도움이 될듯 싶어... 또 미쳐 양해도 구하지 않고 걍,, 올립니다. -_-;formatnumber함수에 대해 자알 정리를 해주셨으니 참고들 하시구요^^
http://www.tubemusic.com운영하시는 사이트에도 한번 놀러들 가보시구요^^;=================================================================================FormatNumber함수를 사용하세요!!
일반적으로.. 소수점 및 3자리마다 콤마(,) 사용시에 많이 사용됩니다.. 예) 12345 -> 12,345 이렇게 표현할려면 DATA = 12345 FormatNumber(DATA, 0)이렇게 처리하면..됩니다...
참고로.. 위의 DATA가 NULL(값이 존재하지 않는다)이면.. 오류가 발생하므로꼭 주의 하시길 바랍니다.. ※ FormatNumber 함수란? ※ 숫자로 형식화된 식을 반환합니다. FormatNumber(Expression [,NumDigitsAfterDecimal [,IncludeLeadingDigit [,UseParensForNegativeNumbers [,GroupDigits]]]]) 인수Expression 필수적인 요소. 형식이 지정되는 식입니다. NumDigitsAfterDecimal 선택적인 요소. 표시될 소수점 이하의 자릿수를 나타내는 숫자 값입니다. 기본값인 -1은 컴퓨터의 국가별 설정을 사용함을 나타냅니다. IncludeLeadingDigit 선택적인 요소. 소수점 이하의 유효 숫자 앞에 0을 표시할지 여부를 나타내는 Tristate 상수입니다. 그 값에 대해서는 아래의 설정을 참조하십시오. UseParensForNegativeNumbers 선택적인 요소. 음수 값을 괄호 안에 넣을지 여부를 나타내는 Tristate 상수입니다. 그 값에 대해서는 아래의 설정을 참조하십시오. GroupDigits 선택적인 요소. 제어판에 설정된 그룹 구분 기호를 사용하여 숫자를 구분할지 여부를 나타내는 Tristate 상수입니다. 그 값에 대해서는 아래의 설정을 참조하십시오. 설정IncludeLeadingDigit, UseParensForNegativeNumbers, GroupDigits 인수는 아래 설정을 가집니다.
상수 값 설명 TristateTrue -1 True TristateFalse 0 False TristateUseDefault -2 컴퓨터의 국가별 설정 값을 사용합니다.
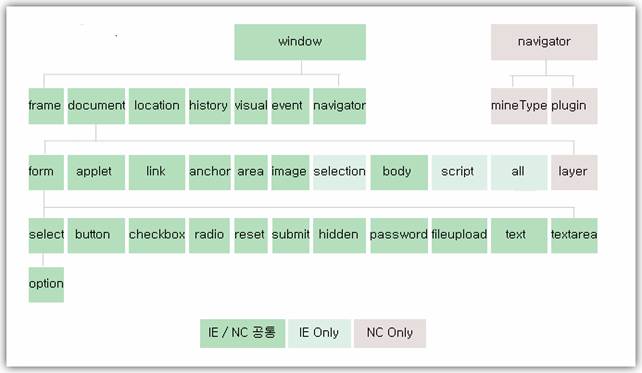
참고하나 이상의 선택적인 인수를 생략하면 컴퓨터의 국가별 설정 값을 생략된 인수 값으로 사용합니다. 메모 모든 설정 정보는 국가별 설정의 숫자 탭에 있습니다. 예제) 1234.123 FormatNumber(DATA, 4) -> 1,234.1230 FormatNumber(DATA, 3) -> 1,234.123 FormatNumber(DATA, 2) -> 1,234.12 FormatNumber(DATA, 1) -> 1,234.1 FormatNumber(DATA, 0) -> 1,234DOM 객체의 기본 구조도를 알아야한다.
이객체들이 어디에 속해있는지 표를
보고 알아야할것이다
1.
내장함수
(1)
내장메시지
함수
alert("Hello."); confirm("정말로 삭제할껴?"); prompt(메시지, 초기값);
(2)
일반내장
함수
isFinite(number)
: number가
isNaN(value) : value가 순수한 문자이면 true, 숫자형태의 문자이면 false를 리턴
number(obj) : obj를 숫자로 변환하여 리턴
string(obj) : obj를 문자로 변환하여 리턴
eval(수식문자열 또는 Object 문자열) : 수식을 처리한 결과를 리턴, Object로 변환하여 리턴
parseInt(문자열, [진수]) : 문자열을 정수로 변환하여 리턴
parseFloat(문자열) : 문자열을 float-실수형으로 변환하여 리턴
escape(string) : ASCII 스트링을 URL로 인코딩
unescape(string) : ASCII 스트링을 URL로 디코딩
encodeURI(string) : 주어진 문자열을 URI로 encoding 한다.
decodeURI(string) : 주어진 문자열에서 encoding 된 URI를 decoding 한다.
encodeURIComponent(string) : 주어진 문자열을 URI로 encoding 한다.
decodeURIComponent(string) : 주어진 문자열에서 encoding 된 URI를 decoding 한다.
(3)
문자인코딩
함수
encodeURI() / decodeURI() : 다음문자만 인초딩한다 è ; / ? : @ & = + $ , - _ . ! ~ * ' ( ) #
encodeURIComponent() / decodeURIComponent() :
알파벳과 숫자 Alphanumeric Characters 외의, 대부분의 문자를 모두 인코딩한다.
escape() / unescape() : encodeURI() 와 encodeURIComponent() 의 중간 정도의 범위로 문자 인코딩
2.
내장
객체
(1) Object
객체
var book = new Object(); // empty Object --> var book = {};
book.title = "내장객체";
book.author = "kspark";
book.published_date = new Array('2006', '2007');
book.getInformation = function() { return this.title + ", " + this.author; }
function DisplayPropertyNames(obj){
var names = "";
for( var name in obj ) names += name + "\n";
alert(names);
alert(obj.getInformation());
}.
(2) Function 객체 : 함수 객체, 객체변수 = new Function([매개변수 리스트], 함수의 처리 내용)
var square = function(x) { return x*x }
var sports = new Object();
sports.soccer = new Function('var name = "soccer"; return name;');
var sum = new Function( "x", "y", "return x+y" );
function execute(){
alert( "Sports name : " + sports.soccer() );
alert( "sum : " + sum(5,10) );
}
(3) Array
배열
객체
length 속성, join(문자열),reverse(),sort(compareFunction),slice(시작위치,종료위치),concat(배열객체)
var list = new
Array();
(4) Date 날짜 객체
var date = new
Date();
getDate, getDay, getFullYear, getHours, getMilliseconds, getMinutes, getMonth,
getSeconds, getTime, getTimezoneOffset, getUTCDate, getUTCDay,
getUTCFullYear, getUTCHours, getUTCMilliseconds, getUTCMinutes,
getUTCMonth, getUTCSeconds, getYear, parse, setDate, setFullYear, setHours,
setMilliseconds, setMinutes, setMonth, setSeconds, setTime, setUTCDate,
setUTCHours, setUTCMilliseconds, setUTCMinutes, setUTCMonth, setUTCSeconds,
setYear, goGMTString, toLocaleString, toString, toUTCString, UTC, valueOf
(5) String
객체
문자열 조작 메소드
toLowerCase(), toUpperCase(), charAt(인덱스), substring(인덱스1, 인덱스2), slice(인덱스1, 인덱스2),
substr(시작인덱스, 길이), indexOf(문자열), lastIndexOf(문자열), concat(문자열), split(분리자, [개수]), charCodeAt([인덱스]), fromCharCode(숫자)
글자 모양을 변경하는 메소드
big(), small(), blink(), bold(), fixed(), italics(), strike(가운데줄), sub(아래첨자),sup(위첨자),
fontcolor("색"), fontsize(크기)
위치 이동하는 메소드
anchor("책갈피명"), link("이동위치");
var str = "Hello! David";
str.slice(6, str.length); str.link(#david);
(6) 수학관련 객체 Math : 각종 수학적 계산을 돕는 Math 객체
Math.PI, Math.sin(x), Math.abs(x), Math.max(x,y)
(7)
수치관련
객체 Number
수치 형태의 문자열을 수치 데이터로 변환하는 객체, new Number(수치 형태의 문자열);
var Ten = new Number("10");
(8) 논리형 객체 Blooean : 논리 객체, new Boolean(논리값);
(9) 스크린 화면 객체 Screen : Screen.availWidth, availHeight(화면의 실제 너비, 높이 ),
Screen.width, height(스크린 실제 너비, 높이), pixelDepth(익스플로워 지원안됨),
colorDepth(사용가능색상수)
(10) Event :
이벤트
객체
이벤트 함수의 종류
Abort (onAbort) : 문서를 읽다가 중단시켰을때(브라우저에서 멈춤을 눌렀을때)
Blur (onBlur) : 사용자가 입력을 포커스를 원도우나 입력양식 요소에서 제거했을때
Click (onClick) : 사용자가 입력 양식의 요소나 링크를 클릭 했을때
Change (onChange) : 사용자가 요소의 값을 바꾸었을 때
DblClick (onDblclk) : 사용자가 입력 양식의 요소나 링크를 더블 클릭 했을때
DragDrop (onDragDrop) : 마우스를 드래그 하는 순간 발생
Error (onError) : 문서나 이미지를 읽는 중에 강제로 중지하는 순간 발생
Focus (onFocus) : 사용자가 입력 포커스를 원도우나 입력 양식의 요소로 이동했을 때
KeyDown (onKeyDown) : 사용자가 키를 눌렀을때
KeyPress (onKeyPress) : 사용자가 키를 누르고 있을때
KeyUp( onKeyUp) : 사용자가 눌렀던 키를 놓았을때
Load(onLoad) : 브라우저에서 문서을 읽었을때
MouseDown(onMouseDown) : 마우스를 누르는 순간 발생함
MouseMove(onMouseMove) : 마우스가 움직일 때
MouseOver(onMouseOver) : 사용자가 link나 anchor위로 마우스로 옮겼을때
MouseOut(onMouseOut) : 마우스가 특정 영역 안에 있다가 나갔을때
MouseUp(onMouseUp) : 마우스 커서를 이미지 맵이나 링크 위에서 내려 놓을 때
Move(onMove) : 윈도우나 프레임의 위치가 이동되는 순간 발생
Reset (onReset) : 사용자가 입력 양식을 초기화 했을 때
이벤트에서 발생하는 객체들의 종류이며 , 네스케이프와 익스플로어의 경우를 따로 분리했다.
[네스케이프
에서의 이벤트
객체]
data : DragDrop 이벤트로 인해 드롭된 객체의 URL이 들어있는 스트링 배열
height, width : 윈도우나 프레인의 길이와 너비(픽셀표시)
pageX, pageY : 픽셀로 나타낸 커서의 수평/수직 위치(페이지에서의 상대적위치)
screenX, screenY : 픽셀로 나타낸 커서의 수평/수직 위치(화면에서의 상대적 위치)
layerX, layerY : 픽셀로 나타낸 커서의 수평/수직 위치, 이벤트가 발생한 레이어에 대한 상대적 위치.
target : 이벤트가 전송된 원래 객체
type : 발생한 이벤트 유형
which : 눌려진 마우스 버튼(left:1, middle:2, right:3)이나 눌려진 키의 ASCII값
modifiers : 마우스나 키 이벤트와 연관된 수정자 키
(ALT_MASK,CONTROL_MASK,SHIFT_MASK,META_MASK) 를 식별
[익스플로어 에서의 이벤트
객체]
screenX, screenY : 픽셀로 나타낸 커서의 수평/수직 위치(화면에서의 상대적 위치)
clientX, clientY : 픽셀로 나타낸 커서의 수평/수직 위치, 이벤트가 발생한 웹페이지에서의 상대적 위치
offsetX, offsetY : 픽셀로 나타낸 커서의 수평/수직 위치,이벤트가 발생한 컨테이너에 대한 상대적 위치
X, Y : 픽셀로 나타낸 커서의 수평/수직 위치, 이벤트가 발생한 문서에 대한 상대적 위치
srcElement : 이벤트가 전송된 원래 객체
type : 발생한 이벤트 유형
keyCode : 키 누름과 연관된 Unicode 키 코드를 식별
button : 이벤트가 발생했을 때 눌려진 마우스 버튼 식별(0:눌려진버튼없음, 1:왼, 2:오, 4:가)
altkey,ctrlkey,shiftkey : true나 false로 설정하여 이벤트가 발생했을 때 Alt키와 Control키, Shift 키 중에 어떤 것이 눌려졌는지 알려준다.
cancelBubble : true나 false로 설정하여 이벤트 버블링을 취소하거나 활성화한다.
fromElement, toElement : 이동 중인 HTML 요소 지정
reason : 데이터 소스 객체에 대한 데이터 전송 상태를 나타내는데 사용
returnValue : true나 false로 설정하여 이벤트 핸들러의 리턴값을 나타낸다. 이벤트 핸들러에서 true나 false를 리턴하는 것과 같다.
위에서 열거한 이런 내용을 암기는 하지 못하더라도 모두 이해하고 어떤경우에 쓰이는지를
파악하고 있어야하겠다. 자바스크립트를 사용하는 사람들의 가장 기본적으로 갖추어야 하는 지식이다.
자바스크립트, 16진수 헥사(Hex), 2진수, 10진수 변환 함수; JavaScript
자바스크립트에서, 10진수 숫자를 16진수나 2진수로 상호 변환하는 방법입니다.
"toString(진법)" 이라는 메서드 속에 진법을 넣어주면 됩니다. 가령, 16진수로 변환하려면 16을 넣으면 됩니다.
JavaScript 진법 변환: 십진수 십육진수 이진수
예제 소스 파일명: example.html
var n;
// 10진수 255를 16진수로 변환
n = (255).toString(16);
document.write(n, '<br />');
// 출력 결과: ff
// 10진수 255를 2진수로 변환
n = (255).toString(2);
document.write(n, '<br />');
// 출력 결과: 11111111
// 16진수 ff를 10진수로 변환
n = (0xff).toString(10);
document.write(n, '<br />');
// 출력 결과: 255
// 16진수 0a를 2진수로 변환
n = (0x0a).toString(2);
document.write(n, '<br />');
// 출력 결과: 1010
// 변수 속의 10진수 123을 16진수로 변환
var foo = 123;
n = foo.toString(16);
document.write(n, '<br />');
// 출력 결과: 7b
// 변수 속의 10진수 123을 16진수로 변환
// + 대문자로 변환
var foo = 123;
n = foo.toString(16).toUpperCase();
document.write(n, '<br />');
// 출력 결과: 7B
</script>
11111111 이런 숫자는 2진수인지 10진수인지 알 수 없으므로, 우선 이 숫자를 문자열로 저장한 후, parseInt()에서 2진수로 간주하여 10진수로 변환하고, 그것을 다시 다른 진법, 예를 들어 16진수로 변환하면 됩니다. 다음 예제와 같습니다.
var n = '11111111'; // 2진수를 문자열로서 저장
n = parseInt(n, 2); // n 속의 숫자를 2진수로 취급하여, 10진수 숫자로 변환
// 10진수화된 2진수를, 16진수로 변환
n = n.toString(16);
document.write(n, '<br />');
// 출력 결과: ff
</script>
링크 : http://unixpapa.com/js/key.html
자바스크립트 키 이벤트 발생 내역 체크 테스트 사이트
자바스크립트 키 이벤트 내역 및 KeyCode를 확인할 수 있는 사이트,바코드 스캐너 등을 통하여 키 이벤트 발생 내역을 체크할 때 유용하다.
 testkey.html
 key.htm
 Prev
Prev

 Rss Feed