'게임/Realms of Arkania - Star Trail'에 해당되는 글 33건
- 2008.07.14 Temple of the Nameless One - First Level
- 2008.07.14 Blood Peaks - Third Level
- 2008.07.14 Blood Peaks - Second Level
- 2008.07.14 Blood Peaks - First Level
- 2008.07.14 Temple of Phex in Tiefhusen
- 2008.07.14 Tjolmar (City Map)
- 2008.07.14 Tiefhusen (City Map)
- 2008.07.14 The Netherswamps
- 2008.07.14 Lowangen (City Map)
- 2008.07.14 Dwarven Pit - Sixth Level
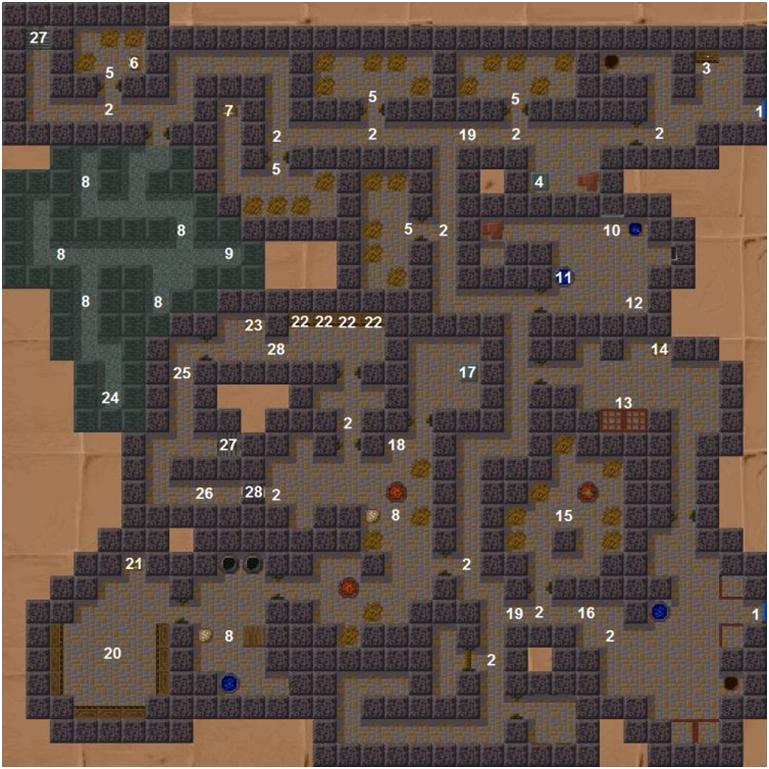
Temple of the Nameless One - First Level
Vault beneath Tjolmar / Temple of the Nameless - First Level (Automap made by Obi-Wahn)

Description
01) Entrance to Ingramosch's house, by which you can leave it as well
02) After the fight against the dwarf and his accomplices you receive a document and find yourselves at this point
03) With the help of the codes on the document you are able to open a secret door by counting the wall sections starting at the entrance door. If you hear a grating noise coming from inside the examined wall, you got the right section (pay attention to the text boxes showing up)
04) Several cave spiders defending their territory
05) The portcullis shuts down once you cross the ramp
06) You may discover a flame key in the pot with the strange tree. The danger of getting poisoned is very high
07) In order to leave this place, split your party so that one hero may pull the hooks hidden in the ornamental eye sockets. After this, the rest of the party is able to pull up the portcullis (see 5) easily. Let the single hero rejoin the party and leave this place together via the ramp, which will cause the portcullis to shut down again. Of course you may even cast "Transversalis" to leave this section
08) In the guard rooms you are attacked by cultists
09) Hitting the gong alarms the guards if you have not defeated them before (see 8)
10) This gong does not make a sound
11) The most interesting thing you may find on this shelf is an elixir of WD
12) A troll will put up a fight against you
13) The chest contains (among other things) a strong magic potion and 3 dried whirlweeds. The blue ring is just decoration and not magical
14) At the statue, Hesinde herself speaks to you. If you donated 1000 silver coins at the temple of Hesinde in Lowangen or Tiefhusen, a spellcaster can get his "Melt solid"-spell raised to 15 while losing 4 AP. Non-spellcasters may receive a permanent WD-gain of 2, losing 7 LP in return. In any case this is worth 2500 EP. Make sure your heroes are worthy otherwise Hesinde will be wrathful
15) Place yourselves on the eastern ramp and cast "Melt solid". The female warrior is released from the block of ice, the well water starts to melt and apart from the NPC Helen you receive another flame key
16) This door can only be opened with a flame key, which gets stuck in the lock afterwards
17) Four ghouls scare your heroes. The least courageous hero drops behind several squares and may rejoin the party after the fight (see automap)
18) Chest: dragon slayer, 2 green rings protecting from fire, 1 red fire banning amulet and a super healing potion. In order to open the chest, the second flame key is necessary!
19) The pseudo stairs do not lead to level 2, but teleport your heroes to different locations of level 1 instead
20) Behind an illusionary wall, you discover a statue of the Nameless. Take the small statuette with you!
21) Another illusionary wall
22) Open the door with the black statuette (see 20)
23) Downwards to level 2
원본 위치 <http://nlt-hilfe.crystals-dsa-foren.de/page.php?117.1>
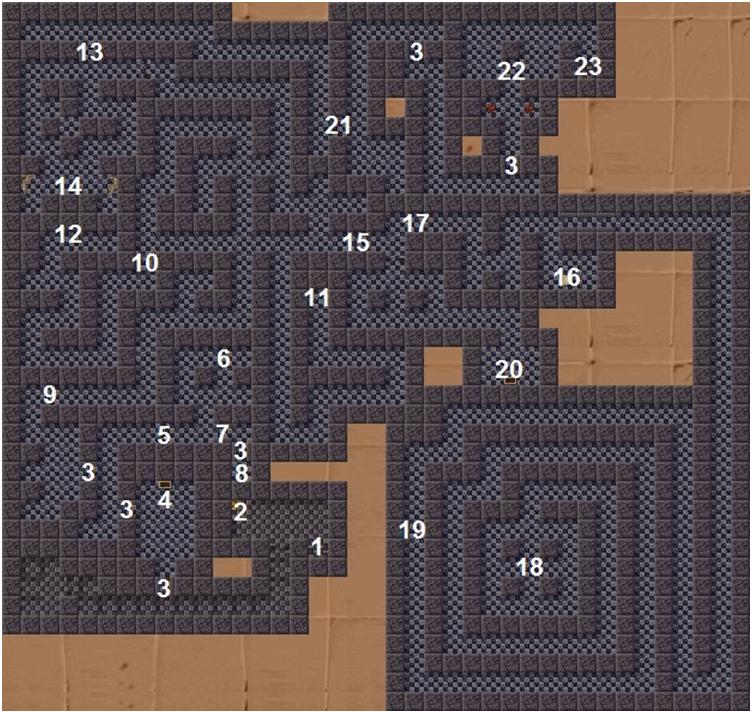
Blood Peaks - Third Level
The Blood Peaks - Third Level (Automap made by Kunar)

Description
01) Stairs leading down to level 2
02) At these points you may run into orcs occasionally. If this happens too often, the alarm is raised
03) Shrine of Tairach: mummified hand, copper disk
04) According to the solution book, this chest can only be opened with the cast iron key (see 13) and the copper disk (see 3). Due to a bug the chest will remain closed however, so do not waste your time on this object
05) You find winter and climbing equipment on the shelves
06) Chest: 3 writing utensils, 3 glass flasks, lute and an alchemy set
07) Chest: 20 torches, 3 lanterns, 10 oils
08) A war axe is lying on the floor
09) This crossbow trap may be disarmed
10) The orcs' war chest: 11 pieces of gold jewelry, 13 pieces of silver jewelry, 20 pieces of orc jewelry and 3211 silver coins in total
11) Chest: the orcish war flag can be torned joyfully
12) This room is just another smithy
13) Chest: robe, winter coat, boots (the only pair!), kukris dagger, 2 wine bottles, copper key, cast iron key
14) The lever deactivates the crossbow trap at 15
15) The crossbow trap is active only if the alarm was raised (see 2). It can be disarmed however
16) You may simply pass through this secret door
17) This exit leads to the outside and is a back entrance if you approach the Blood Peaks from Arsingen
18) 14 orcs and 5 orc veterans linger in the big hall
19) The goulash from the cauldron is saturating, however tasting it costs one LP per hero
20) There is a sword and a brandy bottle in the straw
21) There is plenty of rations and alcohol on the shelves
22) The chest should contain some of the items you had with you as you were captured by the orcs. This is not the case however, as the chest is always empty
23) You find a lot of weapons and armors on the shelves including special equipment for the orcish NPC Thurazz (see level 2, location 23). The chest contains 5 orc sabres, 3x shurin bulb poison, 2x fear poison, sleeping poison, golden glue and kukris
24) Chest: 5 throwing knives, 2x golden glue, menchal cactus, healing potion, 2 wine bottles and a brandy bottle
25) A high perception skill allows you to avoid the pit
26) Chest: 4 wine bottles, 2 brandy bottles, 5 pieces of orc jewelry, 2 silver jewelry, gold jewelry and a born thorn
27) Chest: crossbow, 20 bolts, 2x golden glue, 2 menchal cacti and silver jewelry
28) There is some gold jewelry in the straw
29) This chest cannot be opened! It requires a modified dexterity and lockpicking-skill, which can only be achieved using a hex editor
30) Chest: 3 pieces of orc jewelry, 2 brandy bottles, flute, 2 tarneles and 199 silver coins
31) Chest: orc sabre, dagger (heavy), orcish leather armor, 5 wine bottles, 2 brandy bottles, orc jewelry, silver jewelry
32) Chest: 2 sabres, 4 daggers, 3 pieces of orc jewelry, 2 torches, tinderbox, 2 blankets, 5 brandy bottles
33) You may find whirlweed in the straw
34) The stone sacophargus can be opened if the ST of the first two heroes amounts to 38 at least. A fight against an undead dwarf follows
원본 위치 <http://nlt-hilfe.crystals-dsa-foren.de/page.php?116.1>
Blood Peaks - Second Level
The Blood Peaks - Second Level (Automap made by Kunar)

Description
01) Stairs leading down to level 1
02) At these points you may run into orcs occasionally. If this happens too often, the alarm is raised
03) The door can only be opened with the cast iron key (level 3, location 13)
04) This door can only be opened with the arrow key (see 33)
05) The shelves in the store room contain some merchant's goods
06) This chest should contain all herbs and elixirs you had with you as you were captured by the orcs. As you might have guessed, this is not the case. The chest is always empty
07) Several orcs are standing in the way. The adjoining room to the east holds a red MR-ring if you are able to defeat the combat dogs guarding it
08) Facing the statue of Brazoragh, one hero succumbs to his avarice and begins to scrape off the gold busily. Loot: 3 pieces of gold jewelry
09) A small pile of arena fighters' weapons: 3 daggers (heavy), 3 spears, shield, morning star
10) One of the orcs in this room is carrying a pliers key
11) Chest: skraja, 3 daggers, lantern, 5 pieces of orc jewelry, oil, 2 brandy bottles, lynx key, healing potion and 510 silver coins
12) You should not search the orcs' messy sleeping places
13) Chest: chainmail shirt, pot helmet, dagger (heavy), 3 pieces of orc jewelry, brandy bottle, gold jewelry, sleeping poison and 410 silver coins
14) One of the orcs is carrying a spectacled key
15) You find 19 spears and one pike on the shelf
16) There is a round opening in the ceiling above this shelf. Using a spear, a pike or a stave, you may uncover a passage to the south. This cannot be done with the magical spear found in Blade of Destiny by the way
17) There are merchant's goods on the shelves mainly, additionally you find 2 winter coats and a francesca (throwing hatchet)
18) This chest should contain all pieces of armor you had with you, as you were captured by the orcs. And yes, annoyingly this is not true once again. The chest is always empty
19) The pit trap is active if you were discovered by the orcs and as a result the alarm was raised
20) There is alcohol and rations on the shelves
21) The water from the well temporary raises your CR
22) Table: 2 knives, dagger, tarnele, rations
23) Prison cell: You find the orcish NPC Thurazz in here. He will support you until you manage to leave the fortress
24) Prison cell: The NPC Praiodan vom Tann is imprisoned here. Being a shapeshifter who impersonates himself as a warrior, he will stick with your party longer than all other NPCs do. His companionship has to be handled with care however!
25) If you handed over the Salamander Stone to the battlemages near Lowangen, you will find a dead mage holding the stone in this cell. In case you defeated the mages, the cell will be empty
26) These cells tend to be empty usually. If you were captured by the orcs, your heroes will find themselves in one of the cells marked with 26
27) You find a mirror amulet in this cell
28) The chest can only be opened with the pliers key (location 10). Content: 3x arax poison, 2x fear poison, golden glue, 5 tarneles, 2 healing potions and 3 black phials. These phials contain antidote, which is necessary to fight the queen spider at location 32
29) There is danger of rocks dropping down at these points
30) Cut through the spiderwebs. In most cases you will have to fight several cave spiders afterwards.
Only with these kinds of weapons you are able to cut the spiderwebs:
- all swords
- all axes
- all pointed weapons
-
all two-handed weapons32) If you destroy the clutch, the queen spider will attack you. Be sure you drank the phials from the chest at location 28, otherwise your heroes will not survive this encounter. Split your party in such a way that only the three heroes who drank the phials face the queen 34) You may cut through this spiderweb without being attacked by spiders 36) Several stagga beetles have settled down here 38) Stairs leading up to level 3 원본 위치 <http://nlt-hilfe.crystals-dsa-foren.de/page.php?115.1>
- 37) You may climb up here in order to reach level 3. It is easier to use the stairs instead (see 38)
- 35) The stagga beetles' nests are full of maggots. Search them repeatedly and you shall find a few goodies, though they are not always equal to the ones shown in the text box
- 33) This niche opens after a successful fight and holds (among other things) the arrow key opening the door at 4
- 31) Examine the skeleton and do not deny the question. After battling some cave spiders, you find a magical sword in your baggage, which reduces the bearer's MP and stealth skill by one. A single hero is chanceless in this situation!
- Note: It's not possible to burn down the spiderwebs with a burning torch in hand or using the burn-spell!
Blood Peaks - First Level
The Blood Peaks - First Level (Automap made by Kunar)

Description
01) The exit leads to the outside
02) At these points you may run into orcs occasionally. If this happens too often, the alarm is raised
03) A weapon rack
04) Statue of the orcish war god Brazoragh. By destroying it you will rise in the estimation of the Gods. Ignoring it is a matter that Praios will take badly. If you even donate something the wrath of all Gods will be upon you
05) A fight against some orcs takes place in case you enter these rooms.
06) Chest: 4 daggers, 2 sabres, 3 pieces of orc jewelry, 2 torches, 2 wine bottles, 1 brandy bottle and 38 silver coins
07) Chest: 2 daggers, 5 pieces of orc jewelry, gold jewelry, 3 wine bottles, brandy bottle, whirlweed, tarnele, 2 four-leaved loneberries and 49 silver coins
08) Danger of a caving in threatens at these points
09) A pot helmet is lying in the corner
10) You discover a statue of Gravesh, the orcish god of smithery. If you plunder it, Ingerimm will be displeased too
11) Drinking the water from the well temporary raises your CR and LP
12) You may find a mattock and a sabre between the rubbish
13) 4 orcish war dogs are residing in the kennel. If you kill them throughout the bars you will receive no EP
14) Chest: whip, brandy bottle, strong healing potion and 2 ration packages
15) The ogres' living rooms (search the straw) hold little treasures from time to time, though finding them requires an outstanding perception skill seemingly
16) A high perception skill allows you to discover a tripwire here
17) The altar is dedicated to the orcish god of Death, Tairach
18) Pile of weapons: 9 spears, 5 sabres, 2 orc sabres, 2 gruuf sharks, skraja, sword and an orc hook
19) The pits may be detected and avoided assuming a high perception skill
20) Store room: Lots of rations and alcohol
21) Chest: 20 torches, lantern and 5 oils
22) The armory contains a lot of weapons and armors
23) Chest: 3 iron helmets, ring armor, 3x shurin bulb poison, 2x fear poison, golden glue, kukris
24) The skeleton of a dwarven adventurer carries several ducats and a hatchet
25) The crossbow trap is triggered only if you move from the north to the south
26) You fall into this pit if you move from the east to the west and have the copper key (level 3, location 13) with you. A fight against two stagga beetles follows
27) Stairs leading up to level 2
28) These secret doors can only be opened with the cast iron key (see level 3, location 13)
원본 위치 <http://nlt-hilfe.crystals-dsa-foren.de/page.php?114.1>
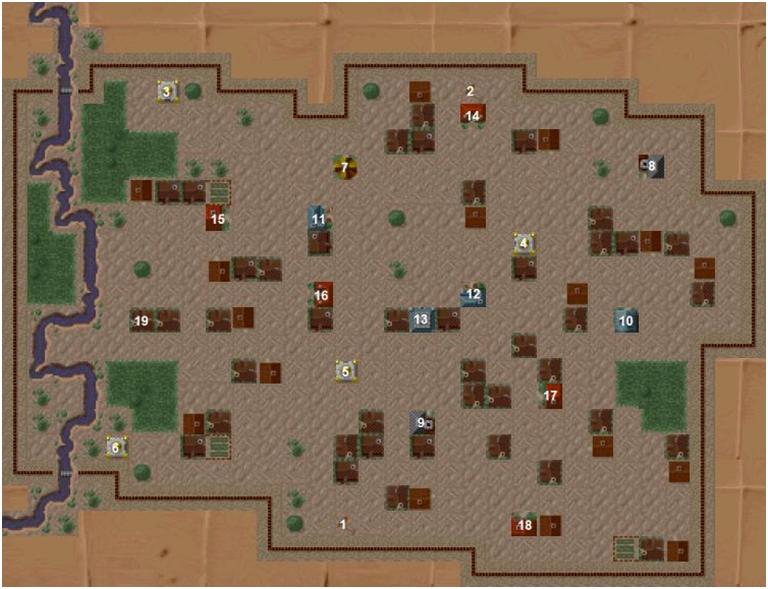
Temple of Phex in Tiefhusen
Temple of Phex in Tiefhusen (Automap made by Kunar)

Description
01) You cannot pass through this door. Hensger has locked you up!
02) You find 10 ration packages here
03) A high perception skill will allow you to discover secret walls. They are a bit brighter than ordinary wall sections
04) When you approach the chest, a fight against some priests, who are joined by a high priest after several rounds, will develop. The chest itself contains a golden throwing axe
05) A portcullis blocks the way back
06) If you pick up the recipe for money crapper, you will have to face 4 skeleton warriors
07) This block of stone is lifted up if you picked up the recipe at 6
08) You find a recipe for magic potion here. After picking it up the portcullis at 5 opens
09) You may avoid the pit if your leader passes a test on perception. Otherwise you will get hurt slightly
10) This secret door unlocks by solving the riddle at 11
11) The correct answer to the question is: AT NIGHT. A false answer brings 4 golems to the scene
12) A pairs game. Uncover three foxes to unlock the secret door at 13
13) This secret door can only be opened by solving the pairs game at 12
14) The plaque warns of Boron's curse. If you examine it, 4 skeleton warriors get ready for battle. The loot is a blue key
15) This door opens if you have the blue key (see 14) with you
16) Donate at least 51 ducats at the offertory bowl and the secret door at 21 will be unlocked. If the bowl is getting plundered you will be teleported inside the snail labyrinth (see 18)
17) The crossbow trap is active if you did not donate at the offertory bowl (see 16) or plundered it
18) To leave the snail labyrinth you have to deal with four fights against three skeleton warriors lurking between the pillars. Afterwards a passage opens in the north wall
19) The teleporter relocates you inside the snail labyrinth. You may overcome it by walking backwards
20) This chest holds a Phex' shield and a Phex' helmet. If you pick them up, a Poltergeist is blocking the way back. Cast "Banish spirits" to drive him away
21) This piece of wall disappears if you donate 51 ducats (or more) at the offertory bowl (see 16)
22) Here you meet Hensger again, who is accompanied by a high priest and the young adept, who sent you on the quest to recover Star Trail at the time in Kvirasim. Bow to the statue and do not attack them, otherwise you will be executed in case you try to spend the night at an inn in Tiefhusen. Furthermore you are rewarded with a lot of EPs if you keep calm!
23) After the conversation you may leave the temple by going upstairs at this point
원본 위치 <http://nlt-hilfe.crystals-dsa-foren.de/page.php?113.1>
Tjolmar City Map (Automap made by Kunar)

Description
01) Route point to the southeast, leading to Norhus
02) Route point to the north, leading to the marshes of Brinnask (the lowlands to the north of Tjolmar)
03) Temple of Ifirn
04) Temple of Rahja
05) Temple of Ingerimm
06) Temple of Firun
07) Healer "Irion". Heals petrified heroes and is the third best healer in the game
08) Smith "Dugobalosch"
09) Smith "Halrima, daughter of Jorma"
10) Herbalist "Ugdalf Abelmin". Has a nice stock of wares. If you plan to transfer your party to "Shadows over Riva", you may invest your money (which would be lost otherwise) into herbs, before entering the Temple of the Nameless
11) Merchant "Halina Druffin"
12) Merchant "Roglom, son of Radresch"
13) Warehouse "Dreaming mummy"
14) "Carriage yard" inn
15) "Bridge guard" tavern
16) "The cosy" inn
17) "Alebeard" tavern
18) "Red Lotus" tavern
19) House of Ingramosch, the dwarven prince. The door can only be opened with the Salamander Stone. Be sure to have the original, not the copy found at Vindaria Leechbronn's house in Lowangen. Do not let the dwarf at the entrance get rid of you, force your way in instead
원본 위치 <http://nlt-hilfe.crystals-dsa-foren.de/page.php?124.1>
Tiefhusen City Map (Automap made by Kunar)

Description
01) Route point to the west, leading to the hermit's lake
02) The pier. You may travel to Tiefhusen by ship, but leaving this town is possible by land only
03) Route point to the north, leading to Hilvalla - Norhus – Tjolmar
04) Route point to the east, leading to the Rorwhed or Gashok
05) You may travel to Svellmia – Netherswamps via the South Gate
06) You enter the town through the North Gate
07) "Northern Light" inn
08) "Firun's hail" inn
09) "The dagger and the sword" tavern
10) "Pile o' gold" tavern. You will meet the drunkard Jandor sitting at a table. Ask him for "Star Trail" until he agrees to arrange a meeting with Hensger
11) "At the duck's bead" tavern
12) "Wide World" tavern
13) Temple of Hesinde
14) Temple of Firun
15) Temple of Rondra
16) Temple of Rahja
17) Temple of Boron
18) Temple of Phex. It is locked. You may enter it with the assistance of Hensger only (quest)
19) Temple of Travia
20) Healer "Jasper Elkensiepen". The most incompetent healer besides Tralloper in Gashok. The next recommendable healer resides in Tjolmar
21) Castle Tiefhusen. Closed for visitors and heroes
22) Smith "Tjall Hövensson"
23) Warehouse "At the mistuned lute"
24) Merchant "Meldavia Gosht"
25) Armorer "Runhild Hermertal". Ask her for "Star Trail". She refers you to Jandor in the "Pile o' gold"
26) Merchant "Rogard Gernebsen"
27) Herbalist "Ariona Silverdew". Has fear poison in stock, though it is not too cheap due to Tiefhusen being the second most expensive town in the Svelltdale. Therefore collecting and selling herbs is a nice business in Tiefhusen
28) Hensger is leaning to a tree here. He will only lead you to the temple of Phex, if you talked to Jandor in the "Pile o' gold" before
Tiefhusen is no shopping paradise, in fact it is a trading paradise instead. As already mentioned, Tiefhusen is the second most expensive town, only exceeded by Lowangen. Selling loot and herbs should ease your money troubles swiftly
원본 위치 <http://nlt-hilfe.crystals-dsa-foren.de/page.php?123.1>
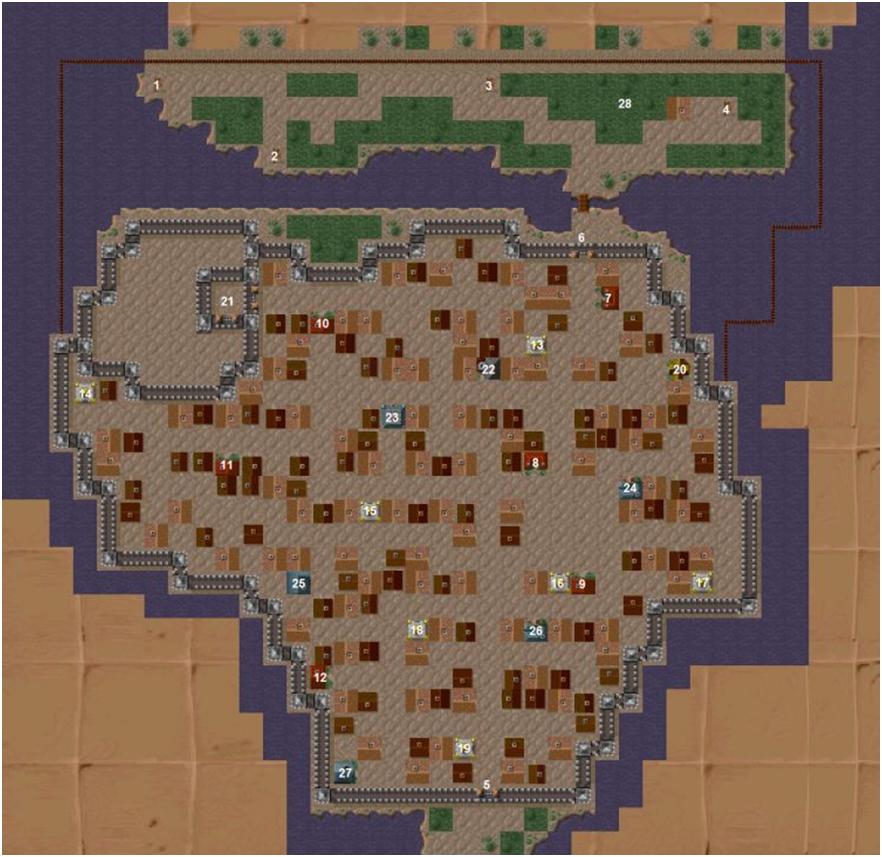
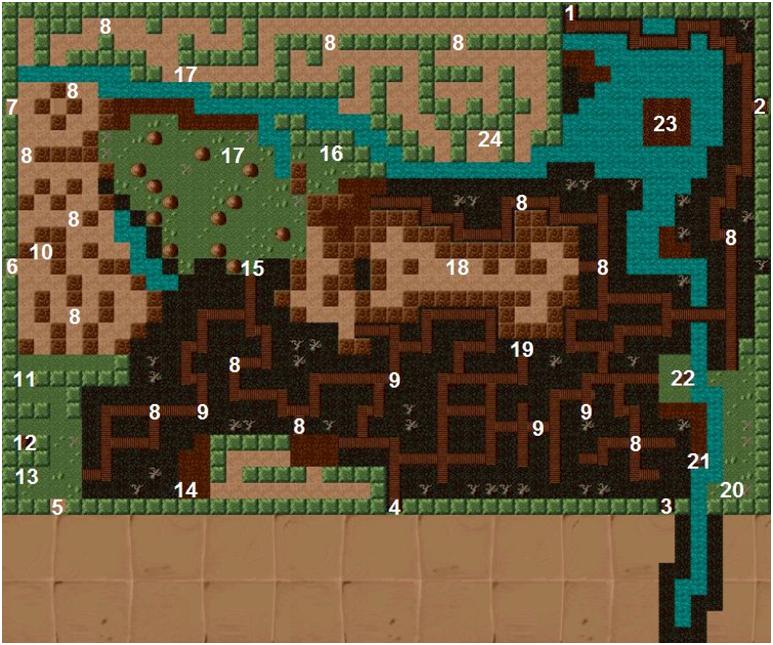
The Netherswamps (Automap made by Kunar)

Description
01) Exit to the north, leading to the Rorwhed (Tiefhusen – Gashok bypass)
02) Exit to the east, leading to the ferryman (Gashok – Neulowangen bypass)
03) This entrance collapses after being used once
04) Exit to the south, leading to the Thash mountains (Lowangen – Arsingen bypass)
05) Exit to the south, leading to Arsingen
06) Exit to the west, leading to the Arsingen – Svellmia riverside road
07) Exit to the west, leading to Svellmia (river port)
08) Fights against orcs, goblins, zombies or swamp rantzies await you in these locations
09) You may stumble upon a poisonous kvill adder here. Beware!
10) A gulmond bush
11) This hedge can only be breached from the north to the south
12) House of the swamp witch. This encounter is enabled if you talked to the lizard chieftain, fulfilled his mission and received Master Eolan's job in Lowangen
13) A large herb garden
14) A cart is stuck in the mud. Besides some items you find 15 ducats
15) Location of the lizard dwelling Ansvell. You may only understand the lizard chieftain if your leader passes a test on "Tongues". In case of need, walk across this field repeatedly, until the text is shown in English. Offer your help and take care of his mission (see 18)
16) A belmart leaf
17) 20 heather plants are lined up along the water's bank. You have to read the swamp rantzy-document (see 21) before you are able to discover them. The eighteenth plant is needed to perform the transformation of the swamp rantzy also known as Agdan Dragenfeld (see 24)
18) The Engulfer lies in wait here. Kill him in order to solve the lizard chieftain's quest and return to location 15
19) A bog body drifts in brackish water. Maybe something special will happen, if the heroes fail a test on necrophobia, though this is unclear by now
20) Some loneberries may be found here
21) The sunk in chest opens as recently as you accept Master Eolan's mission in Lowangen. It contains a net, a healing potion and a swamp rantzy-document. Pick up everything!
22) Zombies dwell in this house. Click on the door to provoke a fight
23) Sorcerer's island. The swamp witch sends you here to sneak in the tower and assassinate its inhabitant. When you are confronted with the fire elemental, choose humble answers like "Help", "Mercy" or "Love" and you shall survive. Take the Noctrux-document and the crystal ball with you
24) A swamp rantzy wearing a dragon ring stands around here. Catch it with the net, but do not kill it! If you have the heather with you and read the Noctrux-document, use the heather to retransform the swamp rantzy into Agdan Dragenfeld. Cure his Numbskull and return to Lowangen together via the secret tunnel
To perform the transformation one hero (whosoever) must have the trapped swamp rantzy, the Noctrux-document (read it first) and the heather in his/her baggage!
Note: To open the chest at 21 it is necessary to turn off the "walk stepwise"-option in the game menu which you can call by pressing the F3 key on your keyboard! Then step towards the chest and it will open. After opening the chest you can return into stepwise mode by pressing the F3 key again and turn the option to ON. This may be a bug in the disk version of Star Trail only which was not fixed.
원본 위치 <http://nlt-hilfe.crystals-dsa-foren.de/page.php?126.1>
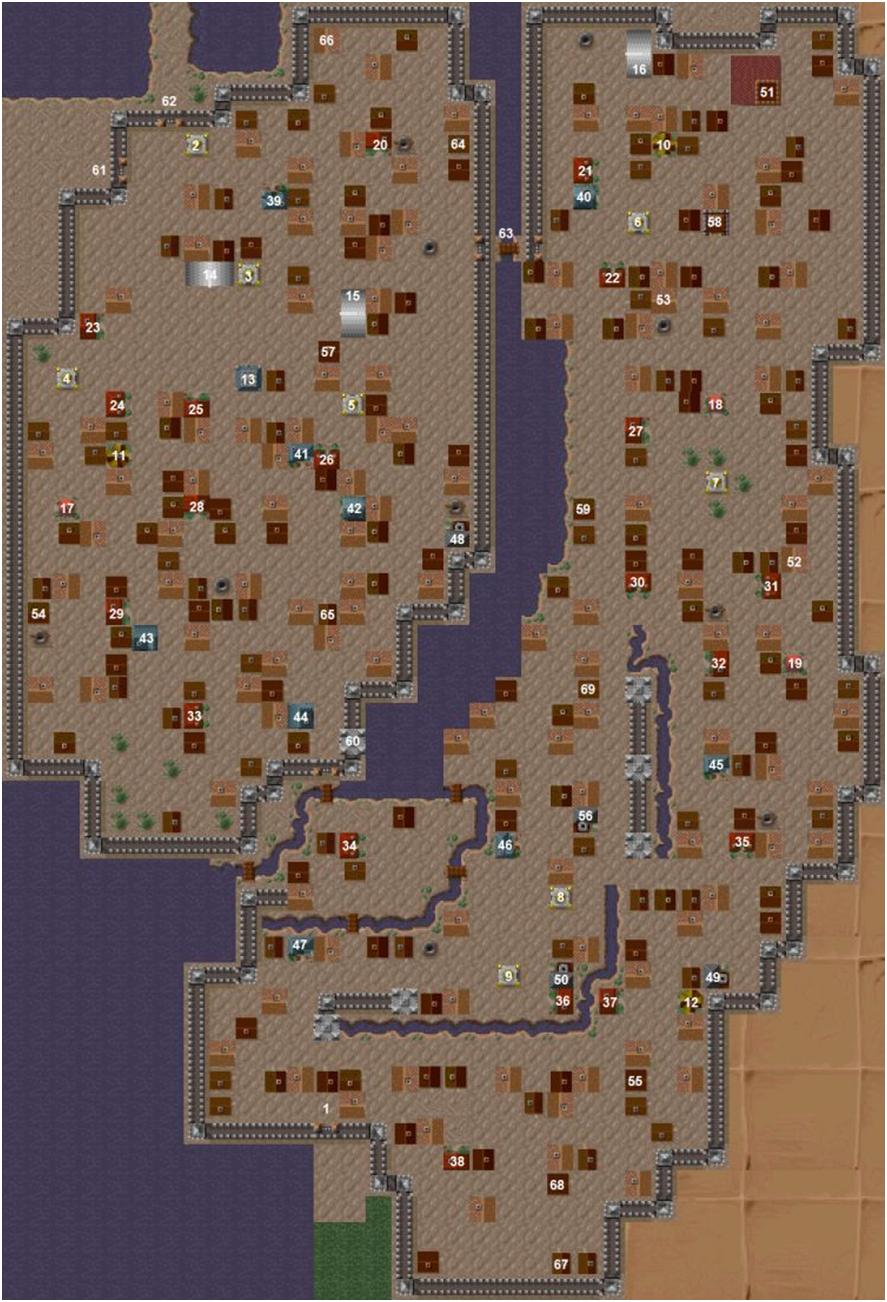
Lowangen City Map (Automap made by Kunar)

Description
01) If you entered Lowangen via the orc camp, you find yourselves at this point. You cannot go back and will be attacked by powerful orcs each time you try to do this
02) Temple of Boron
03) Temple of Hesinde. If you ask the priest for Lowangen, a map of the town is shown
04) Temple of Travia
05) Temple of Phex
06) Temple of Tsa
07) Temple of Rahja
08) Temple of Peraine
09) Temple of Ingerimm
10) Healer "Jhaell Startrail". Is able to cure petrified heroes and the second best healer in the game (according to Star Trail solution book)
11) Healer "Parinor Vormtann"
12) Healer "Kysira"
13) Warehouse "At the happy mouse"
14) Academy of deformations. You may have your magical items analysed here
15) Magistracy. You may donate weapons and food here. Donating 20 swords will leave you as honorary citizens of Lowangen and 5.000 EPs richer (per head)
16) Hall of Power. This is where to deliver Dragan's packet (Dragan's third mission)
17) "Wonderland" brothel
18) "Thousand desires" brothel
19) "The rod and the mare" brothel
20) "Klonballa's" tavern
21) "The White House" inn
22) "Colourful flight" inn
23) "Little fox den" tavern
24) "The inn" inn
25) "Hammer and Anvil" tavern
26) "Bit and Ducat" inn
27) "Salamanderstone" tavern
28) "Dark eye" tavern
29) "Orc death" tavern. You must follow Gavron from here if you want to recover the Salamander Stone
30) "Svelltje palace" inn
31) "Great freedom" inn
32) "Water and wine" tavern
33) "Little prince" inn
34) "Eydal House" inn
35) "Trenchbog" inn
36) "Hammer and Anvil" tavern. Yes, there are two of them!
37) "At the canal" tavern
38) "Last hour" tavern
39) Merchant "Ugo Plotz". The most interesting one regarding his stock
40) Herbalist "Farmion of the Kvill". Worth a look
41) Merchant "Desdira Falconbrook"
42) Herbalist "Dimiona Adingor"
43) Armorer "Eilif Yasmasson"
44) Armorer "Duridanya Zornbrecht"
45) Merchant "Vistella Ebenborn"
46) Merchant "Jandor Ungert"
47) Merchant "Thorescha"
48) Smith "Thorin Bromkop"
49) Smith "Roglima the Great"
50) Smithery of Ingerimm
51) Castle of the Order of Grey Staves. You will leave the town from here via a secret tunnel. Later on this requires the Lowangen key
52) Black Jandora. She demands 500 ducats for further information in respect of leaving the town. After you bring in Dragan's name this will be cheaper
53) Ailian Sevensprings. Possesses the real Salamander Stone
54) Dragan Escht. You depend on his help and relations. Fulfil his missions
55) Vindaria Leechbronn. Possesses a faked Salamander Stone. More goodies are to be found in her house after a successful fight
56) Smith "Berman Helmisch"
57) Market hall. The fight against 20 beggars earns quite a lot of EPs if this is your first encounter with this kind of enemy
58) Exhibition of Art in Craftsmanship. You need to break in here and steal a brooch (Dragan's second mission)
59) The Vinsalter. Get him to Dragan (Dragan's first mission)
60) Guard house and jail. You will be brought here if you get arrested
61) Castle Lowangen. Fights against guardsmen are not profitable. Quite the opposite, your arms will be confiscated and you will be jailed
62) The North Gate of Lowangen. You cannot leave the town, instead you will be attacked by powerful orcs
63) Rainbow bridge. Donate a few bits otherwise Tsa might be displeased
64) Falkert Duberwin. Dragan's contact in respect of weapons
65) Brin Vaskendantz. Dragan's contact concerning overnight accommodation
66) Master Deringorn. This is his home, although you meet him in the Hall of Power (see 16) usually
67) Raisha Rotenegger. Dragan's contact regarding food
68) Pagon Droler. Function in the game is still unknown
69) Zaskia Angrond. Function in the game is still unknown
It is recommended that you spend the night at one of the town's brothels. This results in an improved regeneration of LP and EP and apart from that your equipment will be safe!
원본 위치 <http://nlt-hilfe.crystals-dsa-foren.de/page.php?125.1>
Dwarven Pit - Sixth Level
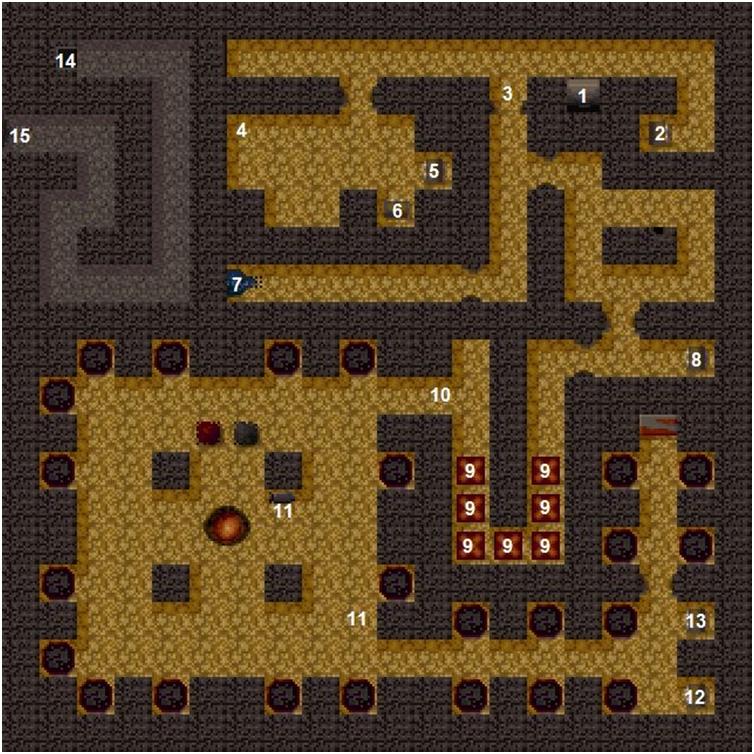
Dwarven Pit - Sixth Level (Automap made by Kunar)

Description
01) Stairs leading up to level 5
02) Chest: sword, dagger (heavy), cudgel, throwing star, 3x girdle of Might, parchments
03) This piece of wall opens with the double bearded key (see level 1, location 5)
04) This hole contains a pouch with an asthenil knife and some coins (red) in it. You only have one try to recover it! Save your game, if you want to nail down these goodies
05) Chest: pants, robes, shirts, winter coats, quilt armors, five times each
06) Chest: key ring, war axe, 2 heavy crossbows, 40 bolts
07) You may refill your waterskins here
08) Chest: leather vests, leather pants, leather boots, seven times each. You need this clothing in order to cross the plates at 9. Put it back afterwards, otherwise the stairs at 1 will be blocked by a massive wall
09) You may walk safely across these plates if you put on the leather clothing found at 8. On your way back with the Salamander Stone, wearing the asthenil ring is helpful. It is sufficient to send one hero across the plates. He/She must be equipped with a burning torch and the stone medallion found earlier. If you violated the dwarven graves on level 3, attacked the stone golem at 11 or pillaged Ingerimm's treasure (13), you will be burnt while wandering across the plates. Ingerimm does not forgive!
10) Use a burning torch with the wall and a passage to the smithy will open
11) At this point you meet a golem, either by just walking over or smiting the anvil. Give him the stone medallion and do not attack! Otherwise you will not be able to leave this place
12) Chest: contains the Salamander Stone. Accept the bartering
13) Here you will find Ingerimm's treasure. It consists of green coins, green jewels, jewelry (green), 5 jewels, 10 pieces of gold jewelry and 5.000 ducats. If you decide to pillage the chest, you will not escape with your life (see 9). Oh well...
14) The shaft leads to level 4. This area can only be reached via level 4 or the mouth of a cave (see 15). Transversalis does not work!
15) The mouth of a cave leads to the outside or the inside as well, if you approached the mountains from the West. However, it collapses after you have used it once and is no longer available
If you mess around with the drain grate (see 7), you may get Numbskull (e-mailed by cassim)
원본 위치 <http://nlt-hilfe.crystals-dsa-foren.de/page.php?132.1>
 Prev
Prev

 Rss Feed